About cryonics

This page contains floating links. To view them install Visible Connections extension and reload the page.

For a long time, I thought cryonics was some kind of scam. That’s because I assumed they just froze you, and since ice takes up more space than the water that formed it, all your cells would get destroyed.

It turns out they use something called vitrification. Basically, they replace your blood with a liquid that doesn’t behave like water when it freezes.

There have even been experiments where researchers vitrified a rabbit kidney, then rewarmed it and transplanted it back into the rabbit. They have also vitrified rabbit brains and some parts of the human body.

The problem with cryonics is that if you wanted to put a person into a kind of cryo-sleep, you would have to cool each organ at different rates and use different cryoprotectants for each one.

But at least they don’t just freeze you destroying all the cells in your body.

What deliverables you should expect from a mobile developer

I’m not going to be talking about nice to have things like documentation, user stories, etc. Let’s talk about absolutely essential, nonnegotiable things.

Source code

I had clients who didn’t even know what source code was and why they needed to have it. Let me explain what it is. If you know it already, just skip this part of the article.

Basically, source code is the text of the program that a programmer writes. Usually it comes in the form of a folder with a bunch of subfolders and text files. Not txt files, but you can open them as text files and read the code. From time to time while working on your project your developer would make a build and send it to you for testing. A build is just a binary file. Binary means that the file contains just zeros and ones and you can’t read it as you would a text file. For Android app it is an APK file, for iOS it is an IPA file (although for iOS they would probably send you a download link, so you wouldn’t even see the actual file).

Those files are just builds, they are not source code. You can run them on your phone, but you cannot publish them. And if your current developer quits on you, you can’t just take the build file to another developer and ask him to continue the work on your project. You’d need to have source code for that.

One of my clients didn’t know about it or rather didn’t think it was important. A freelance developer did some work on his app, published the app and then didn’t provide the source code. After some time when my client needed to do some more work on his project he found out that the freelancer wouldn’t respond. So, he had to hire another developer, but since their was no source code for the previous part of the work, he had to send the new developer the older version of the source code and pay him to basically do everything that has already been done by the previous developer.

Keys for app-signing

The troubles of my client didn’t end with having to do the same work two times and pay double price for it. When the job was done for the second time the new developer started asking for some “key”, because he couldn’t upload the app to the Google Play store. Obviously this developer was not very experienced because he didn’t propose any solutions but just kept on asking for the key. So my client had to ask me for help.

Turned out that the previous developer generated an upload key and didn’t provide it to the client. What is the key? Basically, every time you upload a version of your app to the Google Play store you need to sign it. There are two ways you can do it. You can sign it yourself with your app signing key (not recommended) or you can enrol in app signing by Google (recommended). In the latter case you still need a key, but instead of an app signing key you need an upload key. 

If you signed your app manually with an app signing key, published it and then lost your key, you wouldn’t be able to update your app in the Google Play store. You’d have to publish an update as a separate app.

In our case my client’s app was enrolled in app signing with Google. So we only needed an upload key. Fortunately, it is possible to register a new upload key if you loose or compromise your current key. That’s why it is recommended to use app signing by Google. So, I just generated a new upload key, then wrote to the Google support asking to register the new key. They did it the next day, but said that the new key will be active 1 or 2 days later (I don’t remember exactly, but activation wasn’t immediate). The problem was solved, but my client had to actually pay me some money for my help. This could have been avoided it he knew about app signing beforehand and asked his previous developer to provide the key.

You only need one upload key for your account. Then you can use it to upload any number of apps and app updates. So if you hire a developer to do your first android app, make sure they give you your upload key. What you need to get from your developer is a keystore – a file with jks extension, and two passwords: keystore password and key password. Alternatively, if you know how, you can generate this key yourself and then send it to your developer, so they can publish your app. 

For the iOS app you need to get a distribution certificate with a private key. Your developer should send it to you in the form of a p12 file. Check that the private key is actually there. Double click the file and it should be imported into your Keychain (make sure you are using a Mac computer). You should see the private key there. Again, as with android you can generate this key beforehand if you know how, and then send it to your developer. 

With iOS apps it is not that important to actually get that key from your developer, because you can revoke the certificate and create a new one anytime you want. You don’t need to contact Apple’s support for that.

There is one caveat though, but it most likely doesn’t concern you. If you have an enterprise Apple developer account and you have an in-house app (an app published on your server and not on the App Store), then you should be careful with your distribution certificates and keys. If you revoke a certificate with which your in-house app has been signed that will kill the app. You’d have to republish it.

Ideal situation

If you want to be an Appreneur and publish a lot of small apps, you’d be better off if you learned a few things first.

Learn how to use git. Use GitHub or Bitbucket. That will allow you to have your own code repositories. So instead of receiving archived source code from your developers and then dealing with multiple archives you’d be able to invite developers to your repository. They will push the changes to your repository as they work on your project.

Another useful skill would be the ability to build code from sources. That will allow you to check that the code actually works. You should be able to pull the code from your repository to your computer and then run it on your simulator or an actual device.

And also learn to publish your apps yourself. You can invite developers to your Google Play console and let them publish your app for you, but Apple doesn’t provide such option unless you have an enterprise account ($299 a year). If you have an individual account ($99 per year) you’d have to give your developer login and password from your account. Do you want to entrust your account to some random freelancers? What if they go crazy and delete all your apps?

I had a client who was an appreneur. He had a lot of small apps. And he had a system in place. I just did the coding and pushed the code to his repository. I didn’t have to create builds for testing because he would build from the source himself, and I never had to publish his apps, because he was doing it himself.

Too many app downloads from China. What is going on?

Recently I had quite a few downloads from China. As I later found out, those downloads were fake. I decided to write this post to share my experience with you. And if someone have already had the same experience maybe they’ll share their knowledge with me about what is going on and how to deal with it.

How it all started

First of all let me show you what my app downloads normally look like. This is my stats for the month of April 2017. As you can see, I normally have around 10 downloads per day.

Lets see what happened the next month

In May 2017 it was the same until the end of month when the number of downloads rose from 10 downloads per day to 50-60 downloads per day. I learned that the extra downloads were from China. OK – I thought – Chinese people have discovered my apps at last. And there are a lot of Chinese people out there so nothing surprising. By the way, the app that was downloaded the most at that time was 3Do.

Third month

The number of daily downloads was about the same for the next month. But in the very end of June I experienced a surge of downloads. One day it was 568 downloads total. The next day it was 6,54K. The day after – 7,50K. Now it was my other app – Stream Journal – that was downloaded the most. And all these downloads were once again from China.   

This time I decided to check my stats in Google Analytics, since I have implemented Google Analytics in Stream Journal but haven’t done it in 3Do yet. What I found out is that with all those downloads there was not a single app launch from China.

The possible explanation

I tried to find the explanation to this fake downloads mystery on the internet. But all I could find was other people complaining about having similar experiences with app downloads from China and other asian countries. It all reminded me of a video I once saw on Youtube about Chinese like farms. A like farm or click farm looks something like this.

You just pay for your fake Facebook likes and they give you your likes. But as the video explained they can’t just like only the stuff they were paid for, because in that case they would be easily found out. So they also like some other random stuff.

So, my hypothesis is that exactly the same thing has happened with my app downloads. It may be that one of those click farms found out my apps and used them to make their statistics look unsuspicious to Apple.

Here is the said video, by the way:

What I did about it

At first I put a price of $1 on my Stream Journal app just for one day to see what happens. What happened is that nobody bought my app that day. I made it free the next day. And there was about 100 downloads. Eventually I decided to make all my free apps unavailable in China. Sorry, Chinese people, I just don’t want your click farms to mess up my stats.

Now I enjoy the usual 10 app downloads per day. 

How to deploy Java application to production server

After playing around with server side development (see my posts about it: post1, post2 and post3) I feel like I could develop back-end if I really needed to. Of course it would take a lot of time and I’d be googling a lot, but at least back-end development is not a mystery for me anymore. But there is one piece of knowledge regarding back-end development that I lack: I don’t know how to deploy my application to the production server.

So, I decided to address this issue, and rented a VDS (virtual dedicated server). I’m going to use it for my experiments and eventually for hosting back-ends of my future apps.

My goals are:

  1. Install Tomcat
  2. Install MySQL
  3. Deploy some Java application to the server.
  4. Learn how to use the server for sending Apple Push Notifications.

Here is what I have done already. I started reading about how to install Tomcat and found out that I should install Java first. And even before that I needed to create a sudo user.

Lets go step by step and see what I did.

Creating sudo user

After the purchase of VDS my hosting provider sent me the IP address of my server and the password of root user.  I logged in to the server via SSH.

local$ ssh root@server_ip_address

It is a good practice to not connect to the server as a root user. So I created another user.

# adduser karen

And set his password

# passwd karen

Then I added this new user to the wheel group to make him a sudo user.

# usermod -aG wheel karen

Then I switched to the new user account

# su – karen

Then I verified that I could use sudo

karen$ sudo ls -la /root

This command just lists the contents of /root folder which is normally only accessible by the root user.

I used this article as a reference.

Installing Java

Installing Java was easy. I did it with this one command:

sudo yum install java-1.8.0-openjdk

I verified that Java installed correctly with this command:

java -version

This article helped me.

To be continued.

In the next post I will tell you how I installed Tomcat on my production server.

Xcode crushes every time you open it. How to fix it?

I had this problem today when I decided to open Xcode and start working. It just crushed every time I tried to open it. What to do in this situation? Easy. Just delete xcuserdata from the project. To do this:

  1. go to your project folder in Finder
  2. right click .xcodeproj file (or .xcworkspace file if you use Cocoapods) and choose Show Package Contents
  3. delete xcuserdata folder

How to save an image to photo library (Swift snippet)

This is how I did it in Sigma app with Swift 3.0

    @IBAction func saveToLibrary(_ sender: AnyObject) {
        UIImageWriteToSavedPhotosAlbum(image, self, #selector(image(_:didFinishSavingWithError:contextInfo:)), nil)
    }
    

    func image(_ image: UIImage, didFinishSavingWithError error: NSError?, contextInfo: UnsafeRawPointer) {
        if let error = error {
            // we got back an error!
            let ac = UIAlertController(title: "Save error", message: error.localizedDescription, preferredStyle: .alert)
            ac.addAction(UIAlertAction(title: "OK", style: .default))
            present(ac, animated: true)
        } else {
       
            let ac = UIAlertController(title: "Saved!", message: "The screenshot has been saved to your photos.", preferredStyle: .alert)
            ac.addAction(UIAlertAction(title: "OK", style: .default))
            present(ac, animated: true)
        }
    }


How to free a lot of space on your development Mac computer

Since about a week ago I started working from home. I used to work on a powerful iMac at the office but now the only computer that I use for iOS development is my MacBook Air 13” (early 2014). I also have a monitor and a wireless keyboard. My setup looks something like this.

Everything is well and good, my laptop is powerful enough for my programming work. There is only one thing I don’t like about it: its HD is only 120 Gb so it runs out of memory all the time. Or, used to run out of memory until I figured out how to free a lot disk space.

First of all I installed a program called Disk Inventory X, which allowed me to analyse my disk space usage. Then I found out that the most memory consuming thing on my computer was this folder

~/Library/Developer/Xcode/iOS DeviceSupport

It weighs many gigabytes (it weighed tens of gigabytes when I first found it) and they say that it is perfectly safe to delete everything from this folder. Now whenever I feel like I don’t have enough space I clean this folder.

There is also one other folder that rapidly eats up the disk space.

~/Library/Developer/Xcode/Archives

Every time you build an archive in Xcode it ends up in this folder. The archives for some of the apps I work on take more than 100 Mb. Some days I can make quite a few of these archives. Now I remove the older archives from time to time. Just recently I freed 10 Gb on my computer this way.

By the way, the whole purpose of this post is to remind myself of the location of these folders, so I don’t have to look for it in the future.

Another thing I did: I bought a 1 Tb external hard drive. I use it for storing my photos, movies and backing up my documents. I don’t store any photos on my MacBook any more and I even switched off iCloud sync so that the photos I take on my iPhone don’t automatically end up on my computer. I just move my photos from my iPhone to the external drive manually from time to time. 

Now at any time I have at least 20 Gb of free space on my computer which is pretty comfortable for me and I don’t need to buy another computer which is super good.

Developer’s guide to learning design (and Photoshop)

Here are my thoughts on how one can start learning UI design.

For a very long time I thought that I don’t need to learn design. Or, more precisely, I thought that I must not learn design, because I’m a specialist, and specialists don’t waste their time on things that are outside of their domain of expertise.

But the thing is, I’m interested in design. As far as I can remember I always loved to draw, and I believe I do have at least some artistic abilities. Also, it seems so cool to be able to design and then develop you own apps from start to finish. Nothing hinders your creativity. You don’t  just implement other people’s ideas, you come up with your own ideas, and everything you create is truly yours.

So, I decided to at least try to learn something about design. Maybe I’ll get serious about this design thing one day. And maybe it will not be that bad. Yes, if I do it for real, I might be spreading myself to thinly. But on the other hand, what if I become one of those mythical creatures called unicorn developers? Wouldn’t that be cool?

Learning design is a lot like learning programming

Anyway, for now I’m just learning the basics. More specifically, I decided to learn Photoshop. I have already spent several evenings learning Photoshop, and here is what I have found out.

Learning design is a lot like learning programming. At first I didn’t know where to start, and I thought that maybe I needed to buy a course on Photoshop. But then I decided to take the approach I used for learning programming. And it worked.

First of all you need to learn how to use the tools. To do it you just draw something. And when you try to draw something in Photoshop, you are going to have lots of questions. When you have questions, just Google them. That’s how you learn design. And that’s how I learned programming. There is no need to buy any courses.

What to draw? Don’t try to create at first. Just copy. I believe it is very important, and here is why. If you try to create something as a beginner, you creativity will be hindered by you lack of ability. So you will end up producing something too simple and too ugly. You might have a great vision inside your head, but then you will have to simplify it and distort it to match your limited abilities.

On the other hand, if you just forget about creativity for a while, and concentrate on copying stuff, that will enable you to develop your abilities. This way you know exactly what you are trying to achieve, and you just do whatever it takes to recreate someone else’s design. Your newly developed skills will let you be creative later.

The best way to start with this approach is to go through some tutorials. Here are the tutorials I used.

Tutorial 1Tutorial 2Tutorial 3.

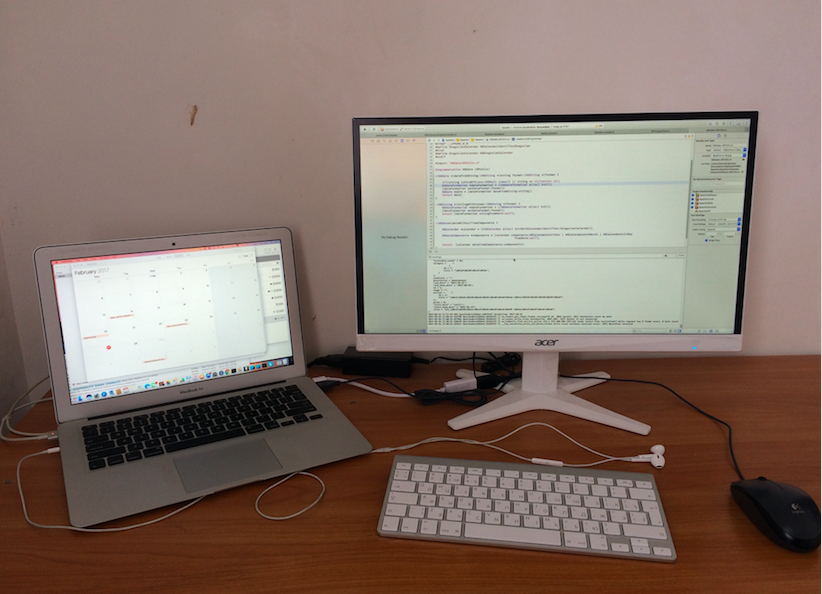
And this is just one example of what I ended up with:

web-ui-kit

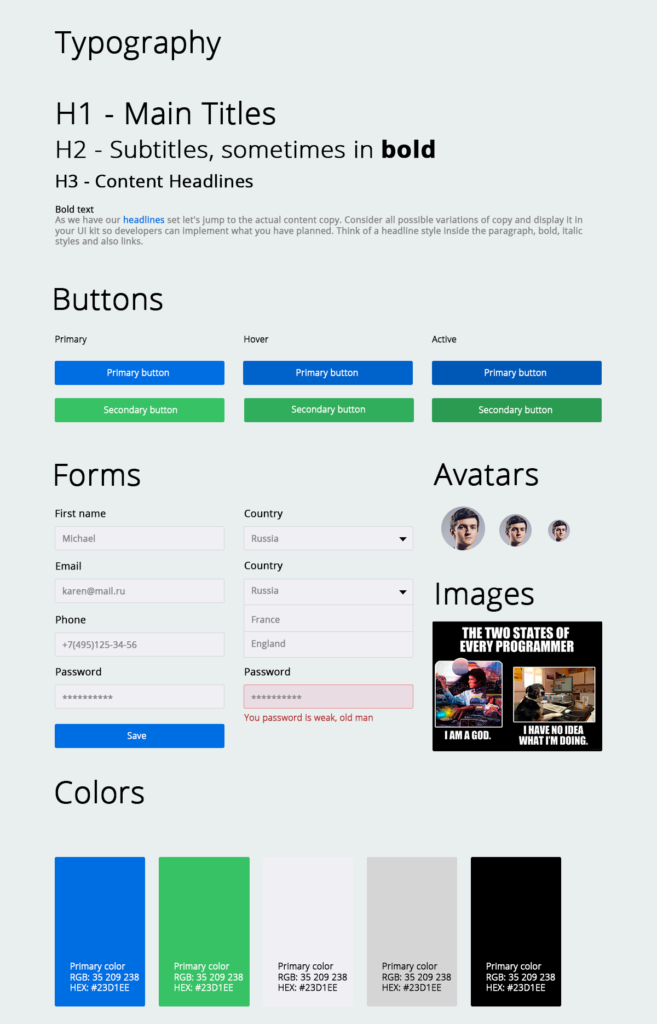
Tutorials are good, because they tell you in great detail, what you should do. I think it is the best way to learn different tools in Photoshop.

I plan on going through a couple more tutorials. Then, the next step is to find a design that I like and try to copy it. This time without a tutorial. Then I will do it for many times for different designs.

Notice, how it is exactly the same as learning programming. In programming you too go through a bunch of tutorials at first. Then you create a bunch of your own apps. Only after that you read books and go through courses.

Other things I discovered

When it comes to mechanical skills of a designer (like ability to use Photoshop) I believe they can be all divided into two big areas.

One is all about rectangles and texts. Seriously, while going through the tutorials, that was all I was doing: drawing rectangles and texts. Now, when we talk about text, there is this thing called typography which is an entire field of knowledge in its own right, and there is a lot I can learn there. But for now I like to think about texts and rectangles as being two parts of one skill set which is all about placing stuff on the screen.

Note, that here I’m only talking about the mechanics of design process. There is a difference between knowing how to place stuff on the screen and knowing where to place stuff on the screen. I’m not even starting to think about learning the latter part just yet.

The second area (or a skill set) is all about illustrations. This one I haven’t yet started to learn. But I think it can be learned the same way, through tutorials. In this case the tutorials don’t need to be necessarily focused on UI design. They can be more general and focused on little things, like, for instance, how to draw a semicircle, or a sector. Stuff like that. Also I know that designers like to use other people’s artwork when it comes to icons, so maybe learning how to do illustrations is not that crucial for a UI designer.

There is also a funny little thing I have learned. Usually, when designers give me their designs so that I can start developing an app, I often notice that they misspell words. Like all the time. And over time that lead me to believe that maybe designers as a species are sort of not very bright people, to put it mildly.

Now, when I started learning Photoshop I discovered the real reason for designers’ ‘illiteracy’. It turned out that Photoshop doesn’t have a spell checking capability (or at least I haven’t found one). BTW, can you find a typo in the picture in this post? I didn’t make it on purpose.

Initializing the Core Data Stack

This post is a little memo I made for myself. Hope it will be useful to you too. You can find the sample code in Apple’s Core Data Programming Guide.

Here are the steps you take to initialise the Core Data Stack.

  1. Initialise Managed Object Model with modelURL. The model file may look like “DataModel.momd” and is located in the main bundle of your project.
  2. Initialise Persistent Store Coordinator with Managed Object Model from step 1.
  3. Initialise Managed Object Context. You can save it as a property, to access it later.
  4. Take Persistent Store Coordinator from step 2 and set it as a Persistent Store Coordinator of the Managed Object Context from step 3.
  5. Create storeURL. Your store can be named something like “DataModel.sqlite”, and should be placed in the Documents directory.
  6. Using the storeURL from step 5 add the store  to the Persistent Store Coordinator from step 2.

That’s it. You should end up with something that looks like this: